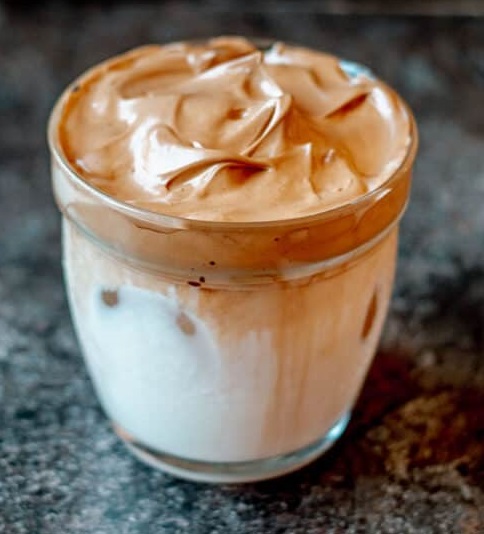
Thermomix Coffee Mousse (Easy & Creamy)
A silky, café-style dessert you can make in minutes — light, fluffy and perfectly balanced between sweet and bold coffee flavor.
🧾 Ingredients (Serves 4–5)
-
200 ml whipping cream (cold)
-
120 g sweetened condensed milk
-
2 tsp instant coffee (or espresso powder)
-
2 tbsp hot water
-
1 tsp vanilla extract
-
1 tbsp cocoa powder (optional but recommended)
-
1 tsp gelatin powder
(or 1 sheet gelatin) -
2 tbsp warm milk (for blooming gelatin)
🔪 Step-by-Step (Thermomix Method)
1. Dissolve the coffee
-
Add instant coffee + hot water to bowl
-
Mix 10 sec / Speed 3
Set aside to cool slightly
2. Bloom the gelatin
-
Mix gelatin with warm milk in a small bowl
-
Let sit 5 minutes
-
Microwave 10 seconds (just to melt — not boil)
3. Whip the cream
-
Insert butterfly whisk
-
Add cold whipping cream
-
Whip Speed 3.5 / 40–60 sec
(Stop when soft peaks form — don’t overwhip) -
Transfer to a bowl and chill
4. Prepare the coffee base
Add to Thermomix bowl:
-
Condensed milk
-
Coffee mixture
-
Vanilla
-
Cocoa powder
-
Melted gelatin
Mix 20 sec / Speed 4
5. Fold
-
Gently fold coffee mixture into whipped cream using spatula
-
Do NOT mix in Thermomix — keep it airy
❄️ Chill
-
Spoon into glasses
-
Refrigerate 2–3 hours (or overnight)
🍫 Optional Toppings
-
Cocoa dusting
-
Chocolate shavings
-
Whipped cream
-
Crushed biscuits
-
Caramel drizzle
💡 Tips for Perfect Mousse
-
Cream must be very cold
-
Stop whipping at soft peaks
-
Fold gently to keep mousse fluffy
-
Espresso powder gives strongest flavor
⏱️ Quick Version (No Gelatin)
Skip gelatin → mousse becomes softer, more like a coffee cream dessert. Chill 4 hours instead.
Would you like a high-protein or low-sugar version too? I can tweak it easily 👍
☕ Creamy Thermomix Coffee Mousse (Easy No-Bake Dessert)
If you love coffee and desserts, this Thermomix Coffee Mousse is about to become your new favorite treat. It’s silky, airy, and tastes like a café-quality dessert — yet takes only a few minutes of prep. No oven, no complicated techniques, and no eggs required.
This recipe is perfect when you want something elegant for guests, a quick weekend dessert, or a make-ahead sweet craving fix. The Thermomix does most of the work: whipping, mixing, and creating the perfect smooth texture.
The result? A light mousse with rich coffee flavor balanced by sweet creaminess — not too bitter, not too sweet.
Why You’ll Love This Recipe
-
No baking required
-
Beginner-friendly
-
Ready in 10 minutes prep
-
Perfect make-ahead dessert
-
Only a few ingredients
-
Stable texture (thanks to gelatin)
-
Tastes like a tiramisu mousse
Ingredients (Serves 4–5)
Coffee Base
-
2 tsp instant coffee (or espresso powder)
-
2 tbsp hot water
-
120 g sweetened condensed milk
-
1 tsp vanilla extract
-
1 tbsp cocoa powder (optional)
Cream Layer
-
200 ml cold whipping cream
Stabilizer
-
1 tsp gelatin powder
-
2 tbsp warm milk
Step-By-Step Thermomix Instructions
1. Dissolve the Coffee
Add instant coffee and hot water into the Thermomix bowl.
Mix: 10 sec / Speed 3
Set aside and let it cool slightly.
2. Prepare the Gelatin
In a small bowl:
-
Combine gelatin + warm milk
-
Let sit 5 minutes
-
Microwave about 10 seconds until melted (not boiling)
This helps the mousse hold its shape and stay fluffy.
3. Whip the Cream
Insert butterfly whisk.
Add cold whipping cream.
Whip: Speed 3.5 / 40–60 seconds
Watch carefully — stop once soft peaks form.
Transfer whipped cream to a bowl and refrigerate.
4. Make the Coffee Mixture
Add to Thermomix bowl:
-
Condensed milk
-
Dissolved coffee
-
Vanilla extract
-
Cocoa powder
-
Melted gelatin
Mix: 20 sec / Speed 4
You now have a smooth coffee custard base.
5. Fold (Important Step!)
Pour coffee mixture over whipped cream.
Gently fold using a spatula until combined.
Do NOT mix in Thermomix — folding keeps the mousse light and airy.
Chill Time
Spoon into serving glasses and refrigerate:
2–3 hours (or overnight for best texture)
The mousse will become creamy, set, and perfectly spoonable.
Serving Ideas
Top your mousse with:
-
Cocoa powder dusting
-
Chocolate shavings
-
Whipped cream
-
Crushed biscuits
-
Caramel drizzle
-
Chocolate covered coffee beans
Perfect for dinner parties or Eid desserts!
Tips for Perfect Coffee Mousse
Use cold cream
Warm cream won’t whip properly.
Don’t overwhip
Grainy mousse happens when cream becomes butter.
Cool coffee first
Hot coffee melts the whipped cream.
Fold gently
Stirring removes the airy texture.
Flavor Variations
Mocha Mousse
Add 40 g melted dark chocolate to coffee base.
Caramel Latte
Add 2 tbsp caramel sauce.
Tiramisu Style
Layer with coffee-soaked biscuits and cocoa.
Low Sugar Version
Use unsweetened whipped cream + sugar substitute instead of condensed milk.
Storage
-
Refrigerate up to 3 days
-
Do not freeze (texture becomes icy)
-
Cover cups to prevent fridge smells
Nutrition (Approx per serving)
-
Calories: ~240 kcal
-
Carbs: 18 g
-
Fat: 16 g
-
Protein: 3 g
-
Sugar: 15 g
Final Thoughts
This Thermomix Coffee Mousse is one of those recipes that feels fancy but is secretly effortless. The Thermomix ensures a perfectly smooth base, while whipped cream gives the dessert its cloud-like texture.
Whether you serve it after dinner, for guests, or just because you’re craving coffee in dessert form — it never disappoints.
Once you try it, you’ll start experimenting with flavors… mocha, caramel, even hazelnut!